iOS - Using Swift in Your Native Modules
Swift is the official and default language for developing native application on iOS.
In this guide, you will explore how you can write your Native Modules using Swift.
The core of React Native is mainly written in C++ and the interoperability between Swift and C++ is not great, despite the interoperability layer developed by Apple.
Therefore, the module you are going to write in this guide won't be a pure Swift implementation due to the incompatibilities between the languages. You'll have to write some Objective-C++ glue code but the goal of the guide is to minimize the amount of Objective-C++ code that is needed. If you are migrating an existing Native Modules from the legacy architecture to the New Architecture, this approach should allow you to reuse most of the code.
This guide starts from the iOS implementation of the Native Module guide. Make sure to be familiar with that guide before diving into this one, potentially implementing the example in the guide.
The Adapter pattern
The goal is to implement all our business logic using a Swift module and have a thin glue layer in Objective-C++ that is able to connect the app with the Swift implementation.
You can achieve this by leveraging the Adapter design pattern, to connect the Swift Module with the Objective-C++ layer.
The Objective-C++ object is created by React Native and it keeps a reference to the Swift module, handling its lifecycle. The Objective-C++ object forwards to the all the methods invocation to Swift.
Creating the Swift Module
The first step is to move the implementation from the Objective-C++ layer to the Swift Layer.
To achieve that, please follow these steps:
- Create a new empty file in the Xcode project, and call it
NativeLocalStorage.swift - Add the implementation in your Swift module like it follows:
import Foundation

@objc public class NativeLocalStorage: NSObject {
  let userDefaults = UserDefaults(suiteName: "local-storage");


  @objc public func getItem(for key: String) -> String? {
    return userDefaults?.string(forKey: key)
  }

  @objc public func setItem(for key: String, value: String) {
    userDefaults?.set(value, forKey: key)
  }

  @objc public func removeItem(for key: String) {
    userDefaults?.removeObject(forKey: key)
  }

  @objc public  func clear() {
    userDefaults?.dictionaryRepresentation().keys.forEach { removeItem(for: $0) }
  }
}
Notice that you have to declare all the methods that you need to call from Objective-C as public and with the @objc annotation.
Remember also to make your class inherit from NSObject, otherwise it would not be possible to use it from Objective-C.
Update the RCTNativeLocalStorage file
Then, you need to update the implementation of the RCTNativeLocalStorage to be able to create the Swift module and to call its methods.
- Open the
RCTNativeLocalStorage.mmfile - Update it as it follows:
//  RCTNativeLocalStorage.m
//  TurboModuleExample

#import "RCTNativeLocalStorage.h"
+#import "SampleApp-Swift.h"

- static NSString *const RCTNativeLocalStorageKey = @"local-storage";

-@interface RCTNativeLocalStorage()
-@property (strong, nonatomic) NSUserDefaults *localStorage;
-@end

-@implementation RCTNativeLocalStorage
+@implementation RCTNativeLocalStorage {
+    NativeLocalStorage *storage;
+}

-RCT_EXPORT_MODULE(NativeLocalStorage)

 - (id) init {
   if (self = [super init]) {
-    _localStorage = [[NSUserDefaults alloc] initWithSuiteName:RCTNativeLocalStorageKey];
+    storage = [NativeLocalStorage new];
   }
   return self;
 }

 - (std::shared_ptr<facebook::react::TurboModule>)getTurboModule:(const facebook::react::ObjCTurboModule::InitParams &)params {
   return std::make_shared<facebook::react::NativeLocalStorageSpecJSI>(params);
 }

 - (NSString * _Nullable)getItem:(NSString *)key {
-   return [self.localStorage stringForKey:key];
+   return [storage getItemFor:key];
 }

 - (void)setItem:(NSString *)value key:(NSString *)key {
-   [self.localStorage setObject:value forKey:key];
+   [storage setItemFor:key value:value];
 }

 - (void)removeItem:(NSString *)key {
-   [self.localStorage removeObjectForKey:key];
+   [storage removeItemFor:key];
 }

 - (void)clear {
-   NSDictionary *keys = [self.localStorage dictionaryRepresentation];
-   for (NSString *key in keys) {
-     [self removeItem:key];
-   }
+  [storage clear];
 }

++ (NSString *)moduleName
+{
+  return @"NativeLocalStorage";
+}

@end
The code is not really changed. Instead of creating a reference to the NSUserDefaults directly, you create a new NativeLocalStorage using the swift implementation and, whenever a native module function is invoked, the invocation is forwarded to the NativeLocalStorage implemented in Swift.
Remember to import the "SampleApp-Swift.h" header. This is a header automatically generated by Xcode which contains the public API of your Swift files, in a format that is consumable by Objective-C. The SampleApp part of the header is actually your App name, so if you created the app with a name that is different from SampleApp, you'll have to change it.
Note also that the RCT_EXPORT_MODULE macro is not required anymore, because native modules are registered using the package.json as described here.
This approach introduces a bit of code duplication in the interfaces, but it allows you to reuse the Swift code you may already have in your codebase, with little extra effort.
Implementing the Bridging Header
If you are a library author, developing a native module that is going to be distributed as a separate library, this step is not required.
The last required step to connect the Swift code with the Objective-C++ counterpart is a bridging header.
A bridging header is an header where you can import all the Objective-C header files that needs to be visible by your swift code.
You might already have a bridging header in your codebase, but in case you haven't, you can create a new one by following these steps:
- In Xcode, create a new file and call it
"SampleApp-Bridging-Header.h" - Update the content of the
"SampleApp-Bridging-Header.h"like this:
//
//  Use this file to import your target's public headers that you would like to expose to Swift.
//

+ #import <React-RCTAppDelegate/RCTDefaultReactNativeFactoryDelegate.h>
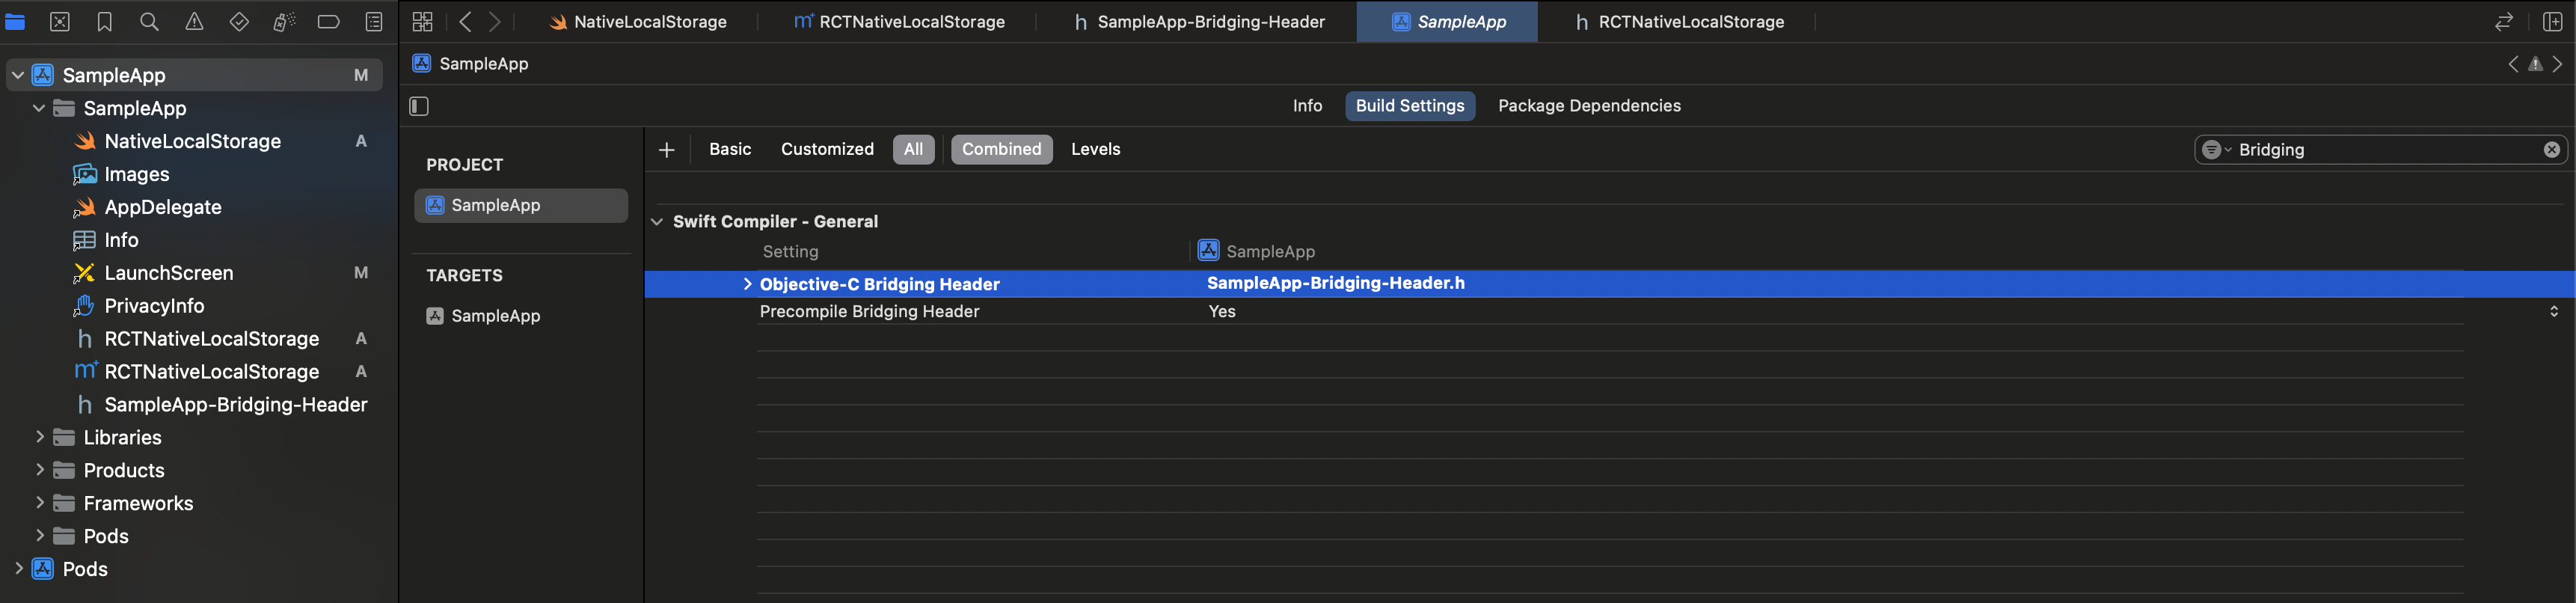
- Link the Bridging header in your project:
- In the project navigator, select your app name (
SampleApp, on the left) - Click on
Build Settings - Filter for
"Bridging Header" - Add the relative path to the "Bridging Header", in the example it is
SampleApp-Bridging-Header.h
- In the project navigator, select your app name (
Build and Run Your App
Now you can follow the last step of the Native Module's guide and you should see your app running with a Native Module written in Swift.