Speeding up your Build phase
Building your React Native app could be expensive and take several minutes of developers time. This can be problematic as your project grows and generally in bigger organizations with multiple React Native developers.
To mitigate this performance hit, this page shares some suggestions on how to improve your build time.
Please note that those suggestions are advanced feature that requires some amount of understanding of how the native build tools work.
Build only one ABI during development (Android-only)
When building your android app locally, by default you build all the 4 Application Binary Interfaces (ABIs) : armeabi-v7a, arm64-v8a, x86 & x86_64.
However, you probably don't need to build all of them if you're building locally and testing your emulator or on a physical device.
This should reduce your native build time by a ~75% factor.
If you're using the React Native CLI, you can add the --active-arch-only flag to the run-android command. This flag will make sure the correct ABI is picked up from either the running emulator or the plugged in phone. To confirm that this approach is working fine, you'll see a message like info Detected architectures arm64-v8a on console.
$ yarn react-native run-android --active-arch-only

[ ... ]
info Running jetifier to migrate libraries to AndroidX. You can disable it using "--no-jetifier" flag.
Jetifier found 1037 file(s) to forward-jetify. Using 32 workers...
info JS server already running.
info Detected architectures arm64-v8a
info Installing the app...
This mechanism relies on the reactNativeArchitectures Gradle property.
Therefore, if you're building directly with Gradle from the command line and without the CLI, you can specify the ABI you want to build as follows:
$ ./gradlew :app:assembleDebug -PreactNativeArchitectures=x86,x86_64
This can be useful if you wish to build your Android App on a CI and use a matrix to parallelize the build of the different architectures.
If you wish, you can also override this value locally, using the gradle.properties file you have in the top-level folder of your project:
# Use this property to specify which architecture you want to build.
# You can also override it from the CLI using
# ./gradlew <task> -PreactNativeArchitectures=x86_64
reactNativeArchitectures=armeabi-v7a,arm64-v8a,x86,x86_64
Once you build a release version of your app, don't forget to remove those flags as you want to build an apk/app bundle that works for all the ABIs and not only for the one you're using in your daily development workflow.
Enable Configuration Caching (Android-only)
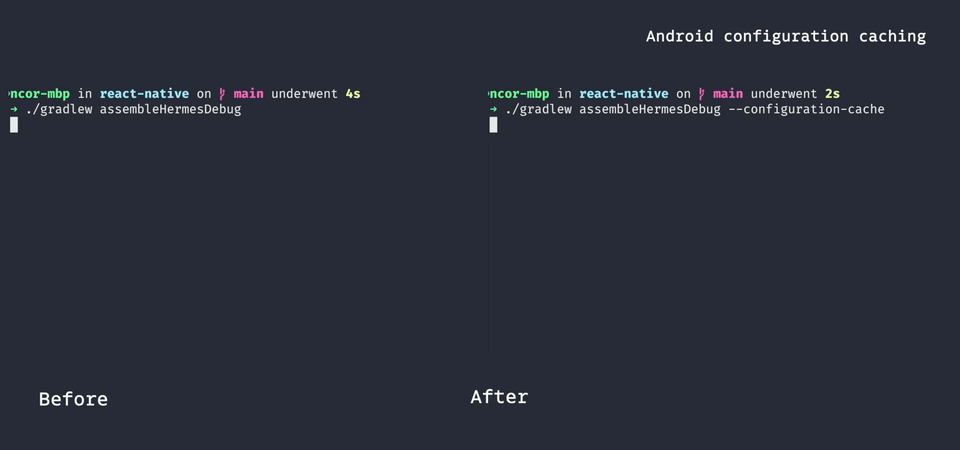
Since React Native 0.79, you can also enable Gradle Configuration Caching.
When you’re running an Android build with yarn android, you will be executing a Gradle build that is composed by two steps (source):
- Configuration phase, when all the
.gradlefiles are evaluated. - Execution phase, when the tasks are actually executed so the Java/Kotlin code is compiled and so on.
You will now be able to enable Configuration Caching, which will allow you to skip the Configuration phase on subsequent builds.
This is beneficial when making frequent changes to the native code as it improves build times.
For example here you can see how rebuilding faster it is to rebuild RN-Tester after a change in the native code:
You can enable Gradle Configuration Caching by adding the following line in your android/gradle.properties file:
org.gradle.configuration-cache=true
Please refer to the official Gradle documentation for more resources on Configuration Caching.
Use a compiler cache
If you're running frequent native builds (either C++ or Objective-C), you might benefit from using a compiler cache.
Specifically you can use two type of caches: local compiler caches and distributed compiler caches.
Local caches
The following instructions will work for both Android & iOS. If you're building only Android apps, you should be good to go. If you're building also iOS apps, please follow the instructions in the XCode Specific Setup section below.
We suggest to use ccache to cache the compilation of your native builds. Ccache works by wrapping the C++ compilers, storing the compilation results, and skipping the compilation if an intermediate compilation result was originally stored.
Ccache is available in the package manager for most operating systems. On macOS, we can install ccache with brew install ccache.
Or you can follow the official installation instructions to install from source.
You can then do two clean builds (e.g. on Android you can first run yarn react-native run-android, delete the android/app/build folder and run the first command once more). You will notice that the second build was way faster than the first one (it should take seconds rather than minutes).
While building, you can verify that ccache works correctly and check the cache hits/miss rate ccache -s
$ ccache -s
Summary:
  Hits:             196 /  3068 (6.39 %)
    Direct:           0 /  3068 (0.00 %)
    Preprocessed:   196 /  3068 (6.39 %)
  Misses:          2872
    Direct:        3068
    Preprocessed:  2872
  Uncacheable:        1
Primary storage:
  Hits:             196 /  6136 (3.19 %)
  Misses:          5940
  Cache size (GB): 0.60 / 20.00 (3.00 %)
Note that ccache aggregates the stats over all builds. You can use ccache --zero-stats to reset them before a build to verify the cache-hit ratio.
Should you need to wipe your cache, you can do so with ccache --clear
XCode Specific Setup
To make sure ccache works correctly with iOS and XCode, you need to enable React Native support for ccache in ios/Podfile.
Open ios/Podfile in your editor and uncomment the ccache_enabled line.
  post_install do |installer|
    # https://github.com/facebook/react-native/blob/main/packages/react-native/scripts/react_native_pods.rb#L197-L202
    react_native_post_install(
      installer,
      config[:reactNativePath],
      :mac_catalyst_enabled => false,
      # TODO: Uncomment the line below
      :ccache_enabled => true
    )
  end
Using this approach on a CI
Ccache uses the /Users/$USER/Library/Caches/ccache folder on macOS to store the cache.
Therefore you could save & restore the corresponding folder also on CI to speedup your builds.
However, there are a couple of things to be aware:
-
On CI, we recommend to do a full clean build, to avoid poisoned cache problems. If you follow the approach mentioned in the previous paragraph, you should be able to parallelize the native build on 4 different ABIs and you will most likely not need
ccacheon CI. -
ccacherelies on timestamps to compute a cache hit. This doesn't work well on CI as files are re-downloaded at every CI run. To overcome this, you'll need to use thecompiler_check contentoption which relies instead on hashing the content of the file.
Distributed caches
Similar to local caches, you might want to consider using a distributed cache for your native builds. This could be specifically useful in bigger organizations that are doing frequent native builds.
We recommend to use sccache to achieve this. We defer to the sccache distributed compilation quickstart for instructions on how to setup and use this tool.